On this site, I share the settings of all devices I have configured for LiFePO4 batteries. As a beginner, it is very confusing to understand all these different options solar charge controllers, BMS, shunts and inverters can give you. I did not know where to start myself!
Through extensive testing with these batteries, I have now set these devices to a, for my setup, optimal state. Below you can find screenshots for these settings as well as the link to the video, where I explained them for this particular device. I go really into details in these videos so you will understand and be able to adapt these settings for your own needs and also different devices.
If you still have any questions, please leave them in the comment section of the relevant video so other viewers can help out as well.
Solar Charge Controller
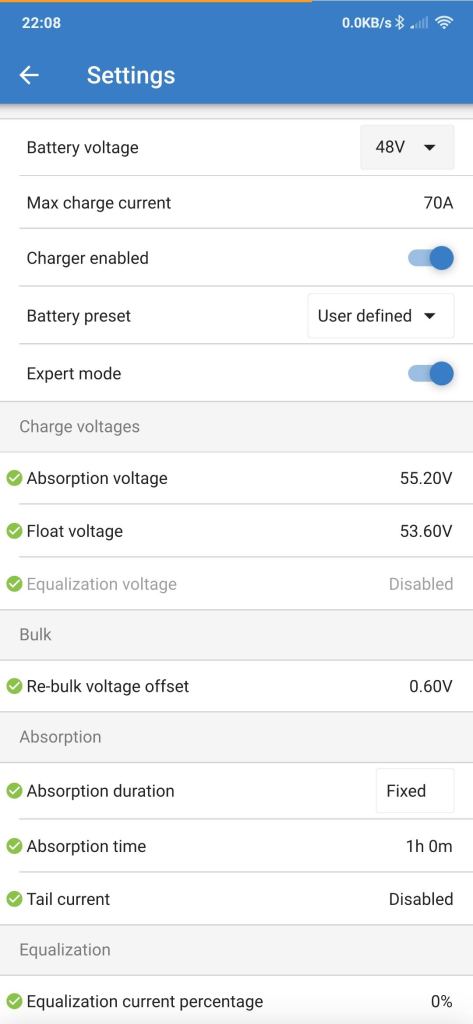
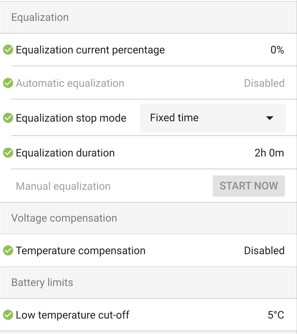
Here are the settings for my Victron Solar Charge Controller but you can adapt these settings for any other controller as well.
Watch the full video here where I explain the settings in all details:
Important settings:
Absorption Voltage: 3.45V/cell
Absorption Time: ~1h
Float Voltage: 3.35V/cell
Link to solar charge controllers
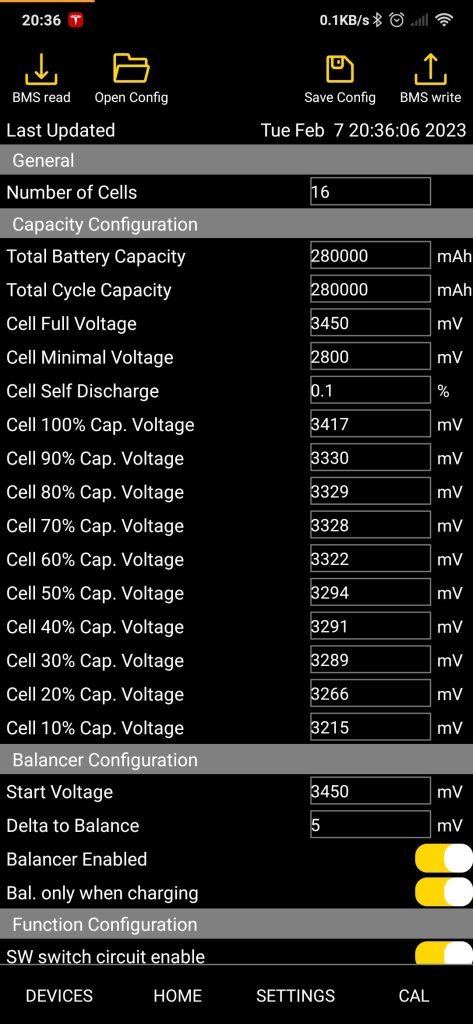
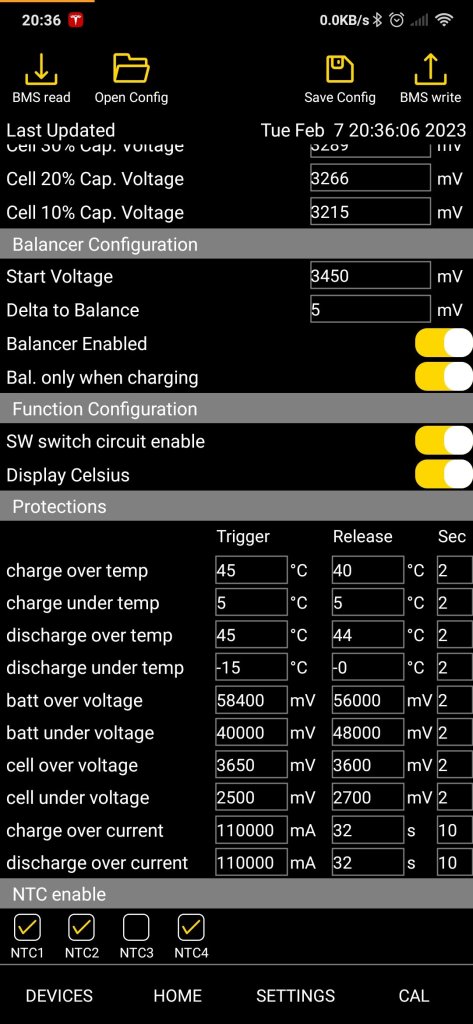
JK-BMS (JK-B Series)
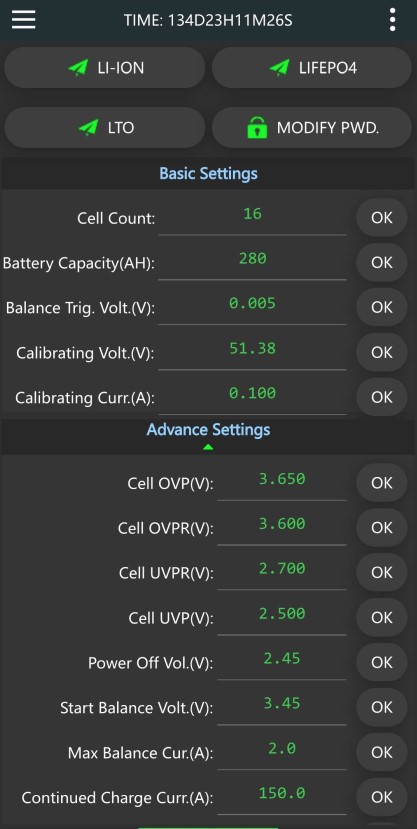
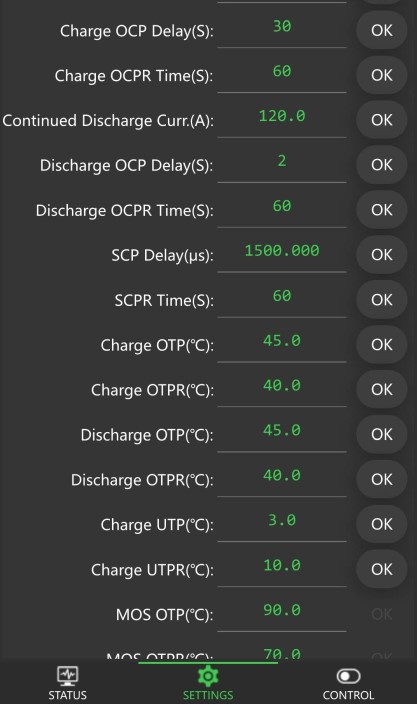
Here are all settings and functions for the JK-BMS I am using. I’m really going into details in this video and explain all menu points and also why I have set these settings as they are.
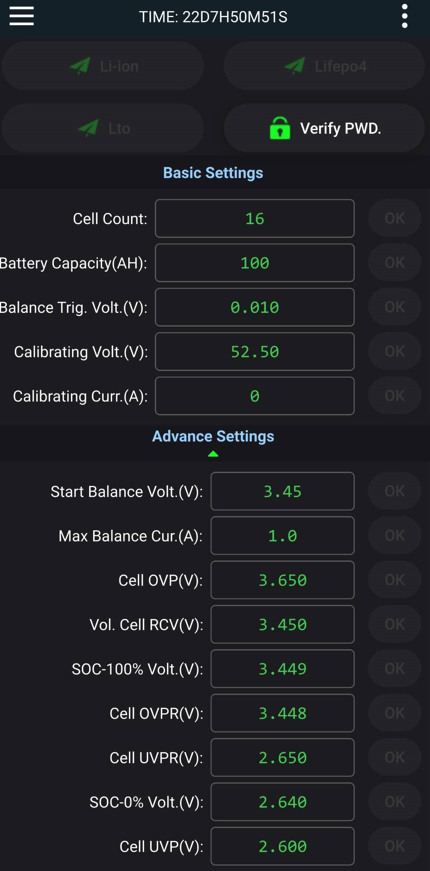
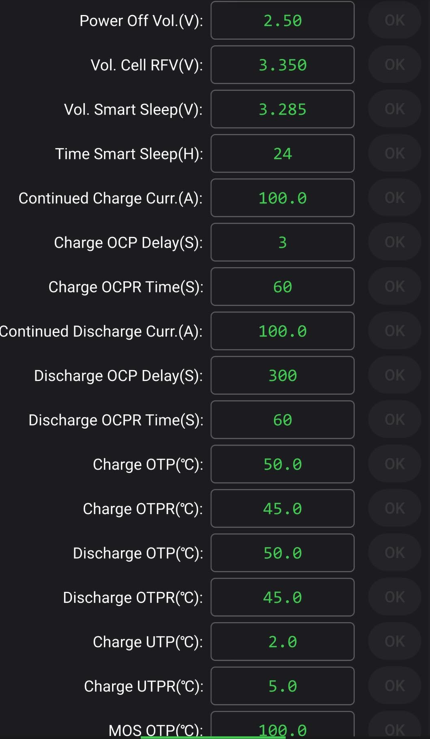
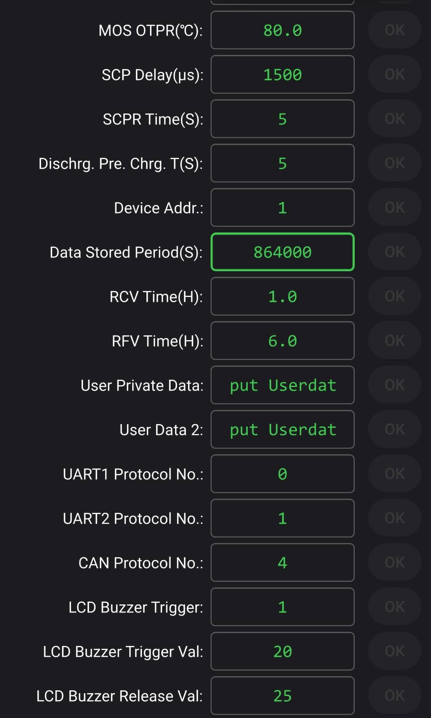
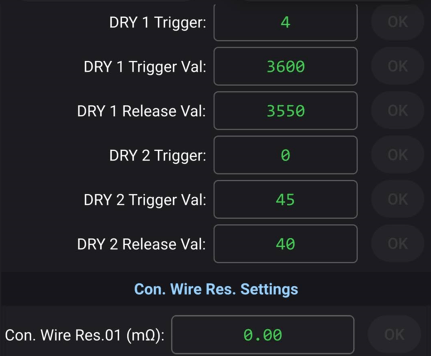
JK Inverter BMS (JK-PB Series)
In this video, I explain all the settings and functions of the new JK Inverter BMS. And there is a lot to explain and to know. This is a fantastic BMS with great features. JK is updating this BMS frequently with new firmware and new functions, like the buzzer and relays functions we have seen recently. The settings and functions are showing the firmware version v14.20.
Watch the video with all settings explained below or have a look at the screenshots on the left for a quick reference.
Link to the JK Inverter BMS with all info and prices.
(The settings for the buzzer and relay 1 and 2 (called Dry1 and Dry2) are set as shown in the video. Obviously, these are just examples, and you need to set your own trigger points and values if you want to use these features.)
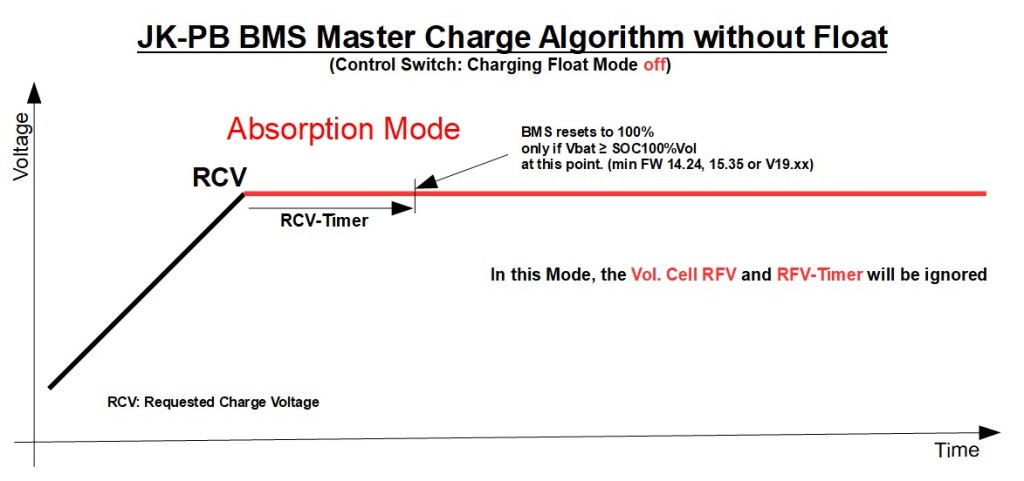
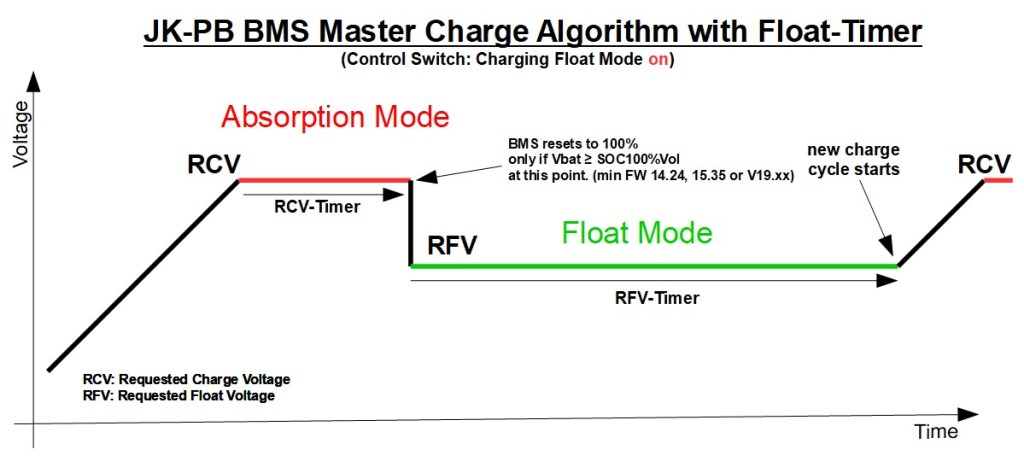
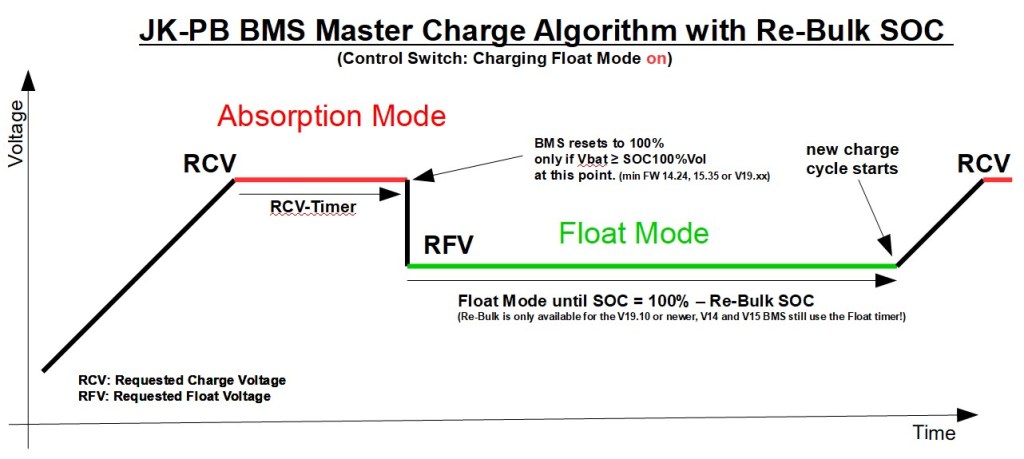
The reliable reset to 100% and the charging algorithm of the JK PB-BMS are explained in this video:
You can download the three graphs with the charging algorithm here.
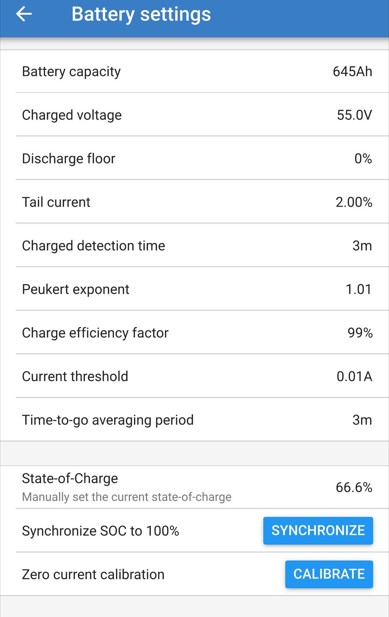
Victron Smart Shunt
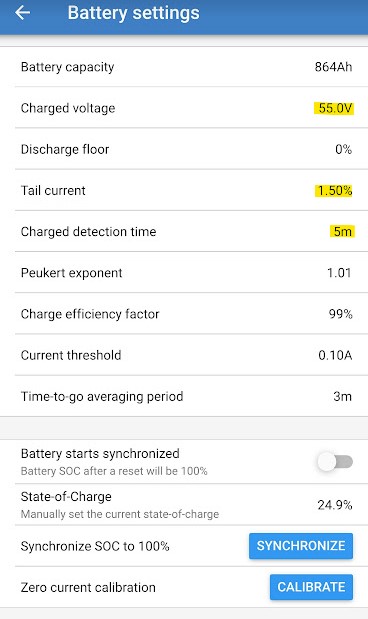
In the video below, I show and explain all the settings and menus of the Victron Smart Shunt. For a quick reference, here is also a screenshot of my settings.
For the shunt to reset (re-calibrate) to 100%, the following three settings must be valid:
– Charged Voltage must have reached the set value
– Tail Current must fall under the set value
– both criteria above must be met for the set Charge detection time
You need to play around with these three settings for your own setup and see what works best.
Link to the Victron Smart Shunt
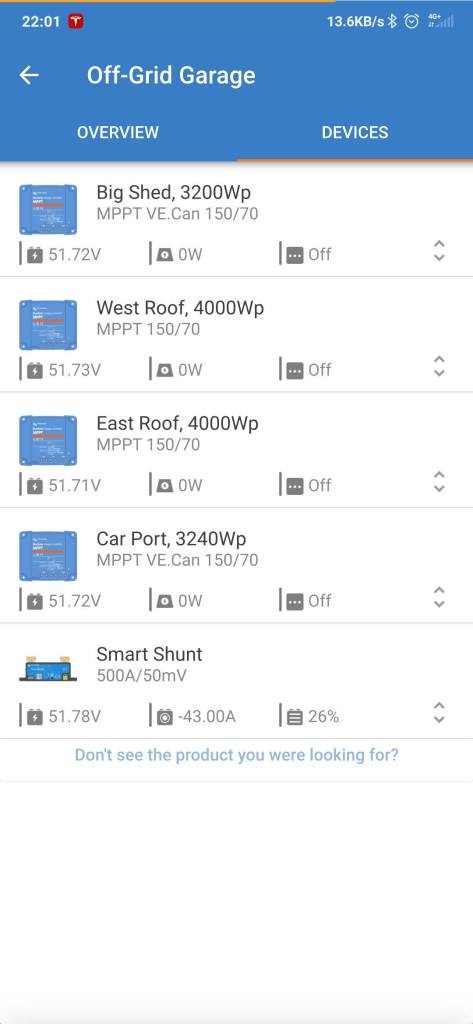
Victron VE.Smart Network
I have set up this Bluetooth smart network between my solar charge controllers and smart shunt.
It synchronises charging between the MPPTs and also shares the voltage and current reading of the Smart Shunt to the MPPTs. This compensates for example for voltage losses over cables if the MPPT is a bit further away.
All in total, I have very good and consistent charging results since I’ve setup this network.
I made a tutorial and how-to video about how to setup the VE.Smart Network, when to setup such a network, and its limitations.
Official Victron Energy VE.Smart Networking documentation and manual.
Overkill Solar BMS settings
I’m reviewing here the configuration I have set in the Overkill Solar BMS 48/100. These settings are the same as for the XiaoXiang app but are being displayed in a better structure and overview in the Overkill Solar App.
Watch the video below for a full explanation.
Victron Lynx Shunt
In the below video, I go through the main settings and features of the Victron Lynx Shunt. I use this device for the S.P.A.T. Calibration Centre and the PowerWall 2.0 and a second battery setup. The settings are very similar to the ones in the Victron Smart Shunt.
Because this is a VE.Can device, the settings can be accessed through the VRM portal as well as through the Victron Remote Console.
For the shunt to reset (re-calibrate) to 100%, the following three settings must be valid:
– Charged Voltage must have reached the set value
– Tail Current must fall under the set value
– both criteria above must be met for the set Charge detection time
You need to play around with these three settings for your own setup and see what works best.
SEPLOS – Victron Connection.
How to set CVL, CCL and DCL through the BMS.
By changing the below settings in the SEPLOS BMS configuration, the BMS has full control over the Victron system and can set CVL, CCL and DCL as per your needs. It all works great but is not really straight forward. Check out the comparison spreadsheet for all the details on how to set these parameters correctly.

With the right settings, the SEPLOS V2 (10E) BMS works actually pretty good together with the Victron system. The BMS still lacks features like absorption timer and float mode but at least with these settings, it is kind of usable. Watch the video here with all the details.
Set the Seplos BMS back to 100%
I did a video about these weird settings. You can find it here.
Depending on the BMS and also firmware version, the settings can vary quite a lot.
Please check the BMS Comparison spreadsheet for all up to date details.
